Yoga

1 Book Review, 5 Useful Health Tips

April 27, 2014

Maybe it’s just me, but Rujuta Diwekar’s tone has become progressively snide and condescending with each book. She sounds like a school teacher – and your least favourite one at that.  So I picked up Don’t Lose Out, Work Out with a little trepidation.  (After all, I felt that using the words ‘Women’ ‘Weight Loss’ and ‘Tamasha’ in the same line is kind of derogatory to the despair that a lot of women go through because of their weight issues.  Lumping up the despair, the depression, the hopelessness, the tears, the dejection, the bleakness, the distress, the discouragement etc as ‘tamasha’ just didn’t seem right to me.) 

And frankly the book reads like a science textbook. I guess Rujuta was trying to convince readers that she actually knows what she’s talking about, and giving her readers scientific proof to back her claims.  What she forgets is that readers are buying her books because they instinctively trust her and her work.  But what Rujuta seems to be doing is, shoving science (or ‘sports science’ as she is quick to point out) down our throats in an attempt to prove to us that we know nothing, and neither does our trainer.  And for that matter neither does your dietician (unless, and this is pure conjecture, she’s Rujuta Diwekar), and alas, neither does your doctor.  Does Rujuta say this in so many words?  No.  She implies it.  Towards the end of the book she writes, “The trainer here is the person who spends the maximum time with you, often waiting…But he is on the fringes of an upcoming profession, either belongs to the middle or the lower middle class, hasn’t really studied beyond 10th or 12th and can barely speak English.  So he/she may know why you should do weight training, why weights will help you…But ask them to put those things in words and they mess up!  And how!”  I have a fundamental problem with this description of trainers…and also with the belief that if I have a trainer then he/she will fit the above description.  The fitness/health/wellness industry that Rujuta herself is a part of has come a long way since she wrote her first book, and so have trainers and trainees.

And I don’t get me started on her Yoga chapter…

However, there are some lessons to be learned (and retained for the future) from the book. Here are five of them:

  1. Walking twice a day will not help you lose real weight or burn more calories.  What a workout which happens twice a day lacks is proper recovery time.  When you’ve walked for an hour, you’ve put a lot of strain your joints, muscles, body chemistry (hormones, oxygen, glycogen etc) and even your breathing.  Rest is important for your body to recover and bounce back.  If your body doesn’t get adequate rest your immunity decreases and you’re more likely to get injured.
  2. There is nothing such as spot reduction.  As a yoga trainer and fitness enthusiast, people have told me countless times that ‘everything else is fine, just my tummy’ or ‘I’m happy with the rest of my body, just my arms’ or ‘the rest of my body looks like me, but my legs look like they are a sumo wrestler’s legs’.  Usually people work out targeting specific ‘problem areas’.  So they’ll do squats to target their butt and leg lifts to target stubborn belly fat.  Repetitions in your workout just help you to utilize the readily available free fatty acid cells (which are a source of energy) in the blood stream instead of targeting the fat residing in the muscles.  And what’s more, this kind of workout has no after-burn, so any calorie burn is only during the repetitions and very little post your workout.  So, if you want to lose your belly fat you will need to balance a workout comprising cardio and a high intensity interval training.
  3. Only increase one parameter of your workout at a time.  So if you’re running on the treadmill, increase only the incline or the speed at one time.  Doing both puts unnecessary strain on your bones.
  4. Plan your workouts in such a way that they never exceed 60 minutes, including your warm-up and cool down.  Chemically the body only has the fuel reserves to work out for 60 minutes.  In fact, for most people the fuel reserves run out after 30 minutes.
  5. Plan your post workout meals well.  45 minutes post your workout is the best time to push more nutrients into your muscles and for your body to use the available nutrients well and to recover from stress and strain so that your immunity doesn’t go down.  So drink a glass of water and eat something which has carbs, protein, fat, vitamins and minerals.  This sounds complicated, but a banana or potato sandwiches are good options.
Yoga

The Approach to a Difficult Situation….

April 16, 2014

…is similar to the approach to a challenging asana.

For instance, the asana below had me stumped since the beginning of this year:

flying crow variation

I don’t remember where I saw it, but I wanted to be able to do it.  I started with getting on to Google and YouTube and trying to find How To videos. Unfortunately, (or, in hindsight ‘fortunately’) I was unable to find anything helpful.  So I approached the ‘problem’ like I would approach writing code during my engineering days.  Break the problem into smaller parts and work on each part.  Eventually, you’ll be able to put the parts together to create a whole.

To be able to do the final pose I would need strong arms and a strong core.  Which meant hours of practicing arm balances with inversions thrown in to get more comfortable with a new perspective.  I went back to my arm balances and started practicing them with a vengeance.  Photographic evidence through the months:

IMG_20140406_115338

The more I practiced, the more my ‘practice’ poses improved:

IMG_20140416_122925        IMG_20140303_142234

I gained enough strength and balance to try new poses.

IMG_20140309_084237      IMG_20140226_212617

And finally one day I finally got it (albeit with a lot of trepidation and shakiness).

IMG_20140213_110310

And now, months after I started my quest, I’ve reached a milestone.  I know, there’s a lot of room for improvement, but that’s how it’s always going to be :).

flying crow variation

Life lessons learnt from this:

1.  It’s not a problem, its a challenge (or in programming language lingo, it’s a ‘constraint’).

2.  All challenges can be broken down into a series of smaller, time bound challenges.  Work on overcoming these smaller challenges within the time-frame you’ve given yourself.  In an attempt to overcome the challenge, don’t be too stingy with your timelines. (Yoga eg.  I’ll go back to practicing my arm balances every day for two weeks.  In the middle of Week 3 I will incorporate new arm balances.  I will practice these every day for another 3 weeks.)

3.  If you hit a roadblock ASK FOR HELP.  Schedule time with your sister, best friend, parent, teacher…and talk about where you are and what you’re facing.  Believe me, insight sometimes exists where you least expect it to be. (Yoga eg.  I wanted a tutorial on how to do the final variation.  But what worked for me was looking at/reading tutorials about all the asanas that I thought I had down pat, and refining them based on advice from experienced teachers.)

4.  Celebrate small milestones.  Remember, challenges are a part of life.  So don’t wait for that fictitious time when you have no more problems or challenges to take a deep breath, or to stretch a little or to have that glass of wine.  Celebrate NOW and re-fuel to continue working tomorrow. (Yoga eg. Reviewing photos of my arm balances improving makes me smile.  For a lot of people these poses are a challenge in themselves.)

5.  Pat yourself on the back for a challenge well faced.  You’re now physically and mentally stronger to face the next one life throws at you. (Yoga eg. This variation needs to be worked on to be more seamless and more stable.)

Yoga

The Key to Your Balance

April 12, 2014

Frequently, the result of today’s lifestyle is a hunched back, back ache, problems with the curvature of the spine etc.  An imbalance in the spine results in an imbalance in the bone structure of the legs, feet and even arms and hands.  Which is why we frequently have a stronger right side than a left side.  This manifests in several ways, including (surprisingly) in how you breathe!  The key to balance is proper alignment.  Alignment is an integral part of a yoga practice.  It’s great if you’re able to go to yoga class regularly, but what about when your favorite teacher takes a holiday?  How can you practice at home without compromising your alignment and balance?

This is where yoga props come in handy.  Various standing poses can be practiced using your yoga belt and blocks to guide your alignment.  Here’s how.

Start with placing your belt flat across the center of your yoga mat.  The belt should be in a straight line, parallel to the edges of your mat.  Keep a block handy for asanas where you need support.

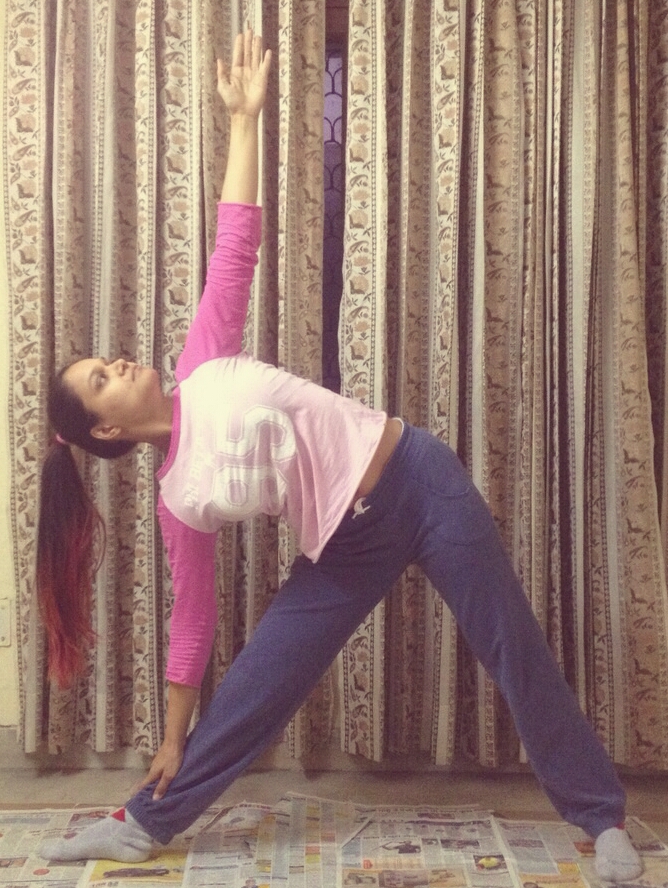
Trikonasana (Triangle Pose)

1.  Start with placing your right foot directly above the belt so that its parallel to the belt.

2.  Place the left foot so that the center of the foot crosses over the belt.  The foot should face forward.

3.  Raise your arms until they are parallel to the floor.  Inhale and lengthen your spine.

4.  Exhale and start to bend towards the right until you can place your hand on your right leg.  Make sure you do not bend your knees.  Do not collapse your neck or your chest.  Visualize your shoulders – they should be in one straight line.

5.  Take a look at your body with reference to the belt.  When you gaze down at your right leg, you should not be able to see the belt.  If you can see it, then your body is not aligned correctly.  Shift your body in such a way that you are unable to see the belt and the line of your body follows the line of the belt.

DSC_0107 DSC_0115 DSC_0114

Virbhadrasana II (Warrior II)

Follow (1)-(3) of Trikonasana.

4.  Next, as you exhale bend your right leg until its parallel to the floor and the belt.

5.  In the final pose when you gaze down at your right thigh, you should not be able to see the belt.  If you’re able to see it, then you know that your thigh and belt are not in perfect alignment.  If this is the case, then shift your position so that you are aligned.

DSC_0109 DSC_0116

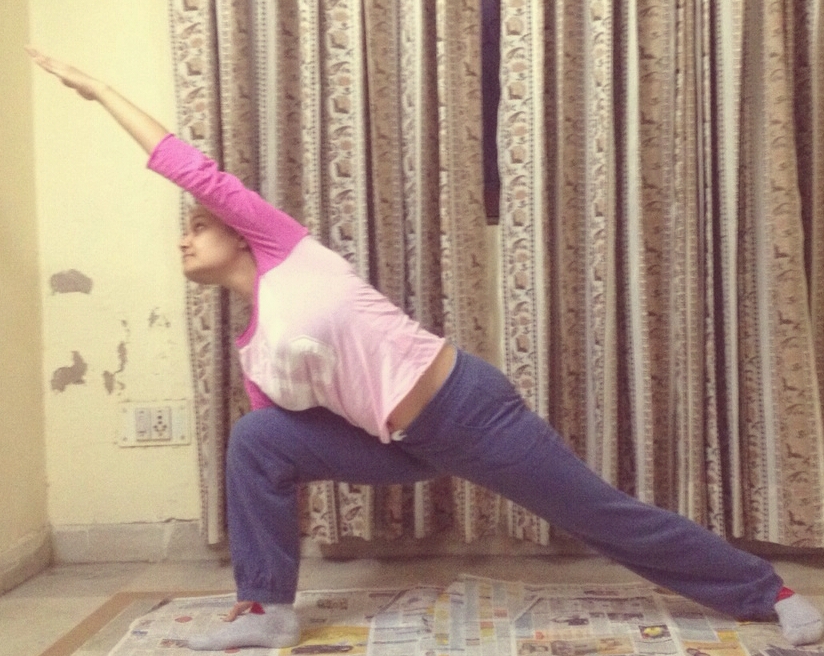
Parsvakonasana (Extended Side Angle Pose)

For the Parsvakonasana follow (1)-(3) of Trikonasana.

4. Now exhale and start to turn you torso so that your right hand reaches the floor.  Since you want to make sure that your shoulders are aligned, your chest open and there is minimum strain on your neck, you can use a block to give you a bit of elevation.  As in the Trikonasana, make sure that your spine is extended.

5. To make sure that your body is in alignment, turn your face and gaze down at your right thigh.  Is the right thigh parallel to and in alignment with the belt?  If yes, great!  If not then shift your body so that it is aligned keeping (4) in mind.

DSC_0112DSC_0119  DSC_0120

Ardhachandrasana (Half Moon Pose)

1.  Place the belt on top of your mat just like in all the previous asanas.

2.  Next, place a block about a foot in front and a foot to the side of the belt.  Since the Ardhachandrasana is about balance as well as an extension of the spine and torso, you will need the block for support.

3.  Now, perform the Virbhadrasana II.

4.  From here extend your right hand and reach out for the block.  Simultaneously, push up with your left leg until this leg is parallel to the floor, and your right hand is on the block.  Gently straighten your left hand as well.  Your shoulders should be in one straight line, torso should be open, spine should be extended.  Extend the heel of the left leg out.

5.  To ensure proper alignment make sure your body follows the line of the belt.

DSC_0113DSC_0125  DSC_0124

Yoga

Yoga: Help With PCOS?

April 8, 2014

PCOS or Poly Cystic Ovarian Syndrome is a condition that 1 in 15 women experience.  To put it briefly PCOS effects a woman’s mensturation cycle, her weight, her moods and her ability to have children.  If left untreated it can lead to cardiovascular disease, diabetes, acne, hair loss, depression.  Here are a few reasons why yoga can help with PCOS:

1.  Most yoga classes incorporate strengthening poses that need to be held for long periods of time.  This helps in building muscle and increased muscle mass helps in decreasing insulin resistance.

2.  Most power yoga and Ashtanga yoga classes will have you increasing your heart rate and building up a sweat.  This helps in burning fat and getting you back into shape.

3.  Most yoga classes have a combination of pranayama and meditation techniques and this helps in calming down the body and ensuring the cortisol is in check.

4.  A regular yoga practice helps to build a positive self image and acceptance of your body.  This helps you to live in harmony and fortifies you to deal with whatever emotional and physical problems may come your way.

To derive benefits from yoga it’s imperative that you cultivate a wholesome daily practice.  Poses such as the Butterfly Pose, Badhakonasana, Suptabadhakonasana, Bhardvajasana etc can help in treating the symptoms of PCOS.  Along with these, the SuryaNamaskar provides a great way to build up a sweat and burn fat.  However, when you look for a yoga class make sure that it incorporates elements of the Surya Namaskar and asanas so that you get a holistic workout daily.  This will ensure steady progress and long lasting results.


Yoga

5 Yoga Poses You Must Do Daily

March 11, 2014

Perhaps the question I’m asked most frequently is about what poses I believe should be done daily to maintain good functioning of life and limb. I’ve come up with 5 poses for beginners, intermediates and advanced students alike. These poses address body parts which are prone to injury or neglect. These poses are low impact, so there’s very little room for injury. So, without further ado, the five poses I’ve homed in on are as follows and in sequence:
1. Marjari Asana or the Cat Stretch – this asana has many physical benefits and is great to gently ease open a stiff spine. It allows you to breathe more deeply, completely and efficiently. It helps to strengthen your wrists and arms, as well as move the cervical region. This goes a long way in maintaining the flexibility of the neck muscles, preventing stiffness of the neck and shoulders, and ensuring that no stress is stored and built up in the neck and along the length of the spine .
2. Virbhadrasana or the Warrior Pose – This is a great pose to tone up your abdomen and legs. Hold it for a couple of breaths to strengthen the legs and tone the abdominal muscles. It allows the chest to fully open up and enables better breathing. Your arms shoulders and legs get a great stretch. The massage to the abdominal organs increases metabolism and helps eliminate excess fat around the waist.
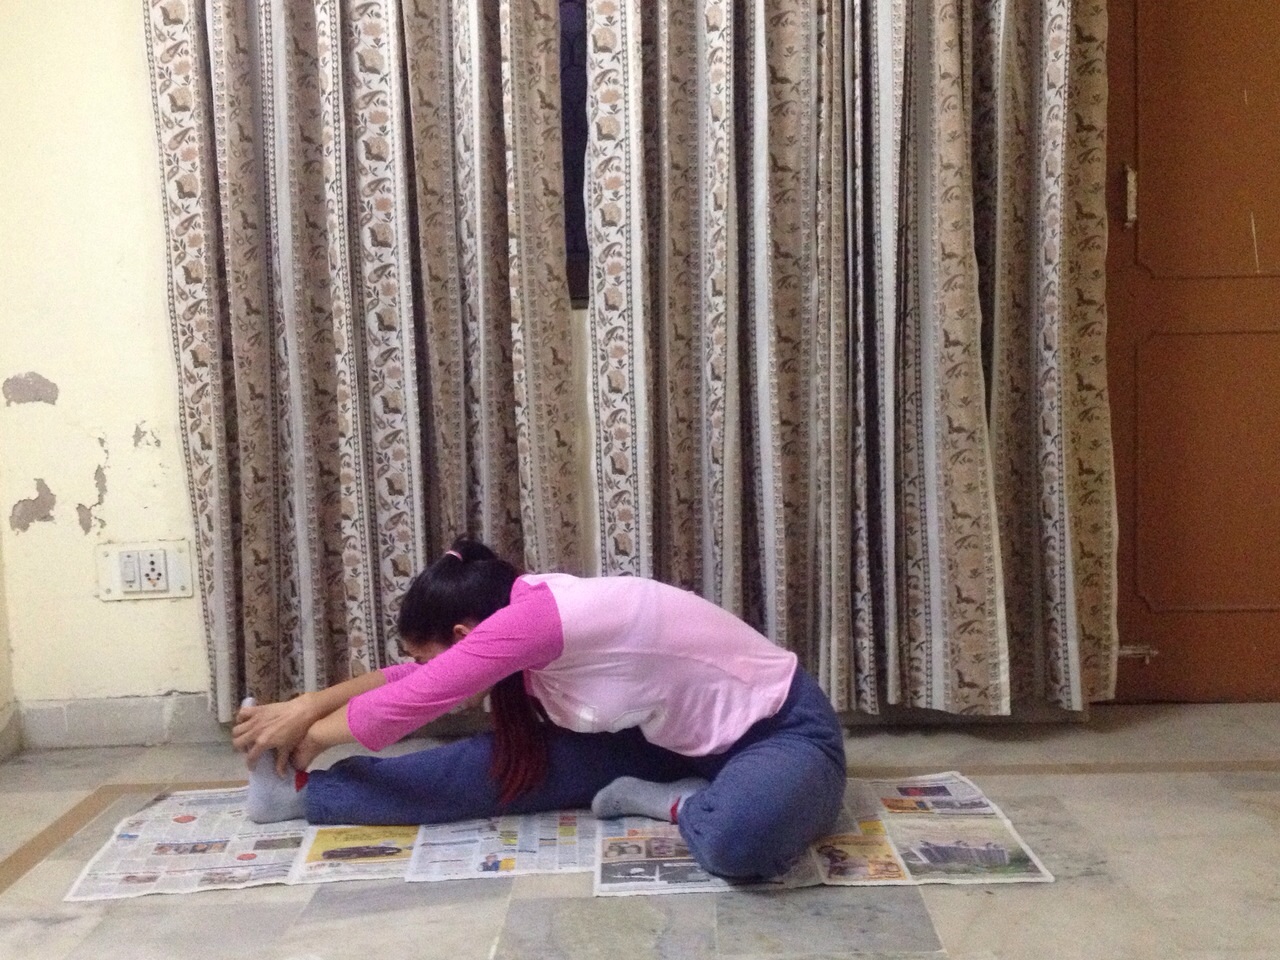
3. Janu Sirsasana or Head to Knee Pose – This pose is a complete stretch for the body. The stretch originates at the back of your ankles and goes up your calves, the back of your knees, your thighs, your back, shoulders and arms. It is believed that this pose helps in preventing wrinkles and calming the mind. It also provides a massage to your abdominal organs and therefore is great to reduce excess fat around your waist and increase your metabolism.
4. Pashchima Namaskarasana or the Reverse Prayer Pose – This is a great one to open up your chest and to stretch, strengthen and tone the arms. Doing this every day ensures that your shoulder blades and back get a good stretch. Movement of the shoulder joint also ensures flexibility and mobility of this joint.
5. Padmasana or the Lotus Pose –The ankle, knee and hip joints tend to get ignored when we have too little time to workout. The Padmasana and its variations ensure that you work on the flexibility of your lower body while at the same time ensuring that you’re working on your posture, your abdominal muscles and your meditation abilities.

Pictures for these coming up soon!

Yoga

5 Ways to End the Quest for Inner Peace

March 4, 2014

At the end of the yoga session today my teacher talked about his belief regarding ‘Mindful Observation of Thoughts’ (which will make for another interesting blog post). The gist of it was relevant to the eternal quest for inner peace. He said that we spend our lives searching for this inner peace. We look for it in our thoughts, our surroundings, perhaps in the food that we eat, the people who we choose to be with…however, we can’t look for peace outside and assimilate it within us. We have to create a silence within us for peace to reside, and look at life from the vantage point of this silence. And that is when you will be in a state of bliss.
So here are 5 ways to cultivate the silence within:
1. Spend 5 minutes every day observing your thoughts. Make an effort during these 5 minutes to not sit in judgement of the thoughts that are passing through your mind. Also make an effort not to relive the emotions brought about these thoughts, be they positive or negative.
2. Start your day before those in your house do. Even if it’s just 15 minutes early. Spend those first 15 minutes of the day with yourself. Water your plants. Drink lukewarm lemon and honey water. Stretch. Smile. Read. Spending 15 minutes daily with yourself will ensure you nurture a more fulfilling relationship with yourself, and this will ensure better quality of your days.
3. Pursue an extra-curricular activity passionately. So if you’ve always wanted to learn photography, do so now. If you’ve always wanted to learn karv maga, do so now. Making time and effort to pursue something you’ve been putting off creates a behavioural pattern which tells you that what you want to do can be fulfilling, and enables you to put yourself first before the rest of life.
4. Accept the situation and work around it. You might not like your job, but until you change it, deal with it. You might not like your neighbour, but until you live next to each other, deal with it. You might not like your current haircut, but until it grows out, deal with it.
5. Breathe deeply. Whether you are stressed, overwhelmed, happy, annoyed, joyful, irritated, elated, blissful, worried, tired, energetic, optimistic, pessimistic, disappointed, fascinated, delighted….

Yoga

The Chaturanga/Plank Pose

February 19, 2014

How To:

  1. Start with standing in Tadasana.
  2. Bend at your waist and place your hands on the floor next to your feet.  Make sure to align your toes and your fingers.  Spread your fingers wide on the floor so that your body weight can be evenly supported.
  3. Now lift your right leg up off of the floor and place it as far back on the floor as you can.  Do the same for the left leg.
  4. Make sure your wrist, elbow and shoulder are in one line.  And your body should be parallel to the floor.  Lock your knees and elbows.
  5. Pull your stomach in and make sure that your abdomen does not sink towards the floor.

Variations

  • For a more intense hold, place your elbows on the floor making sure that the elbow and shoulder are in one line.
  • You can also bend your elbows and lower yourself half way down to the floor and hold yourself in this position.

Benefits

  • Strengthens your wrists, arms and shoulders.
  • Great to strengthen the spine.
  • Tones the abdomen.

Contraindications

  • Do not practice if you have wrist or shoulder injuries.
  • Practice with great caution if you have back problems.

chaturanga