Browsing Tag

yoga for back pain

Enquiries Into Yogic Philosophy

Supta Marichyasana – Reclining Spinal Twist

May 3, 2020

Marichi means ray of light.  The story of Sage Marichi goes back to the creation of the universe. (Beyond Asanas: The Myths and Legends Behind Yogic Postures, Pragya Bhatt)

Before I begin writing a blog, I like to research the topic a little more.  Surprisingly, there is very little information for this asana online.  Which is ironic because the Supta Marichyasana is practiced widely as a closing posture in yoga classes all over the world.  In writing this blog I had to look at my own experience with the posture and I also asked Medha for hers.  My introduction to this asana was through Baba Ramdev’s yog shivirs, where he endorses this asana as a great way to trim excess fat from the sides.

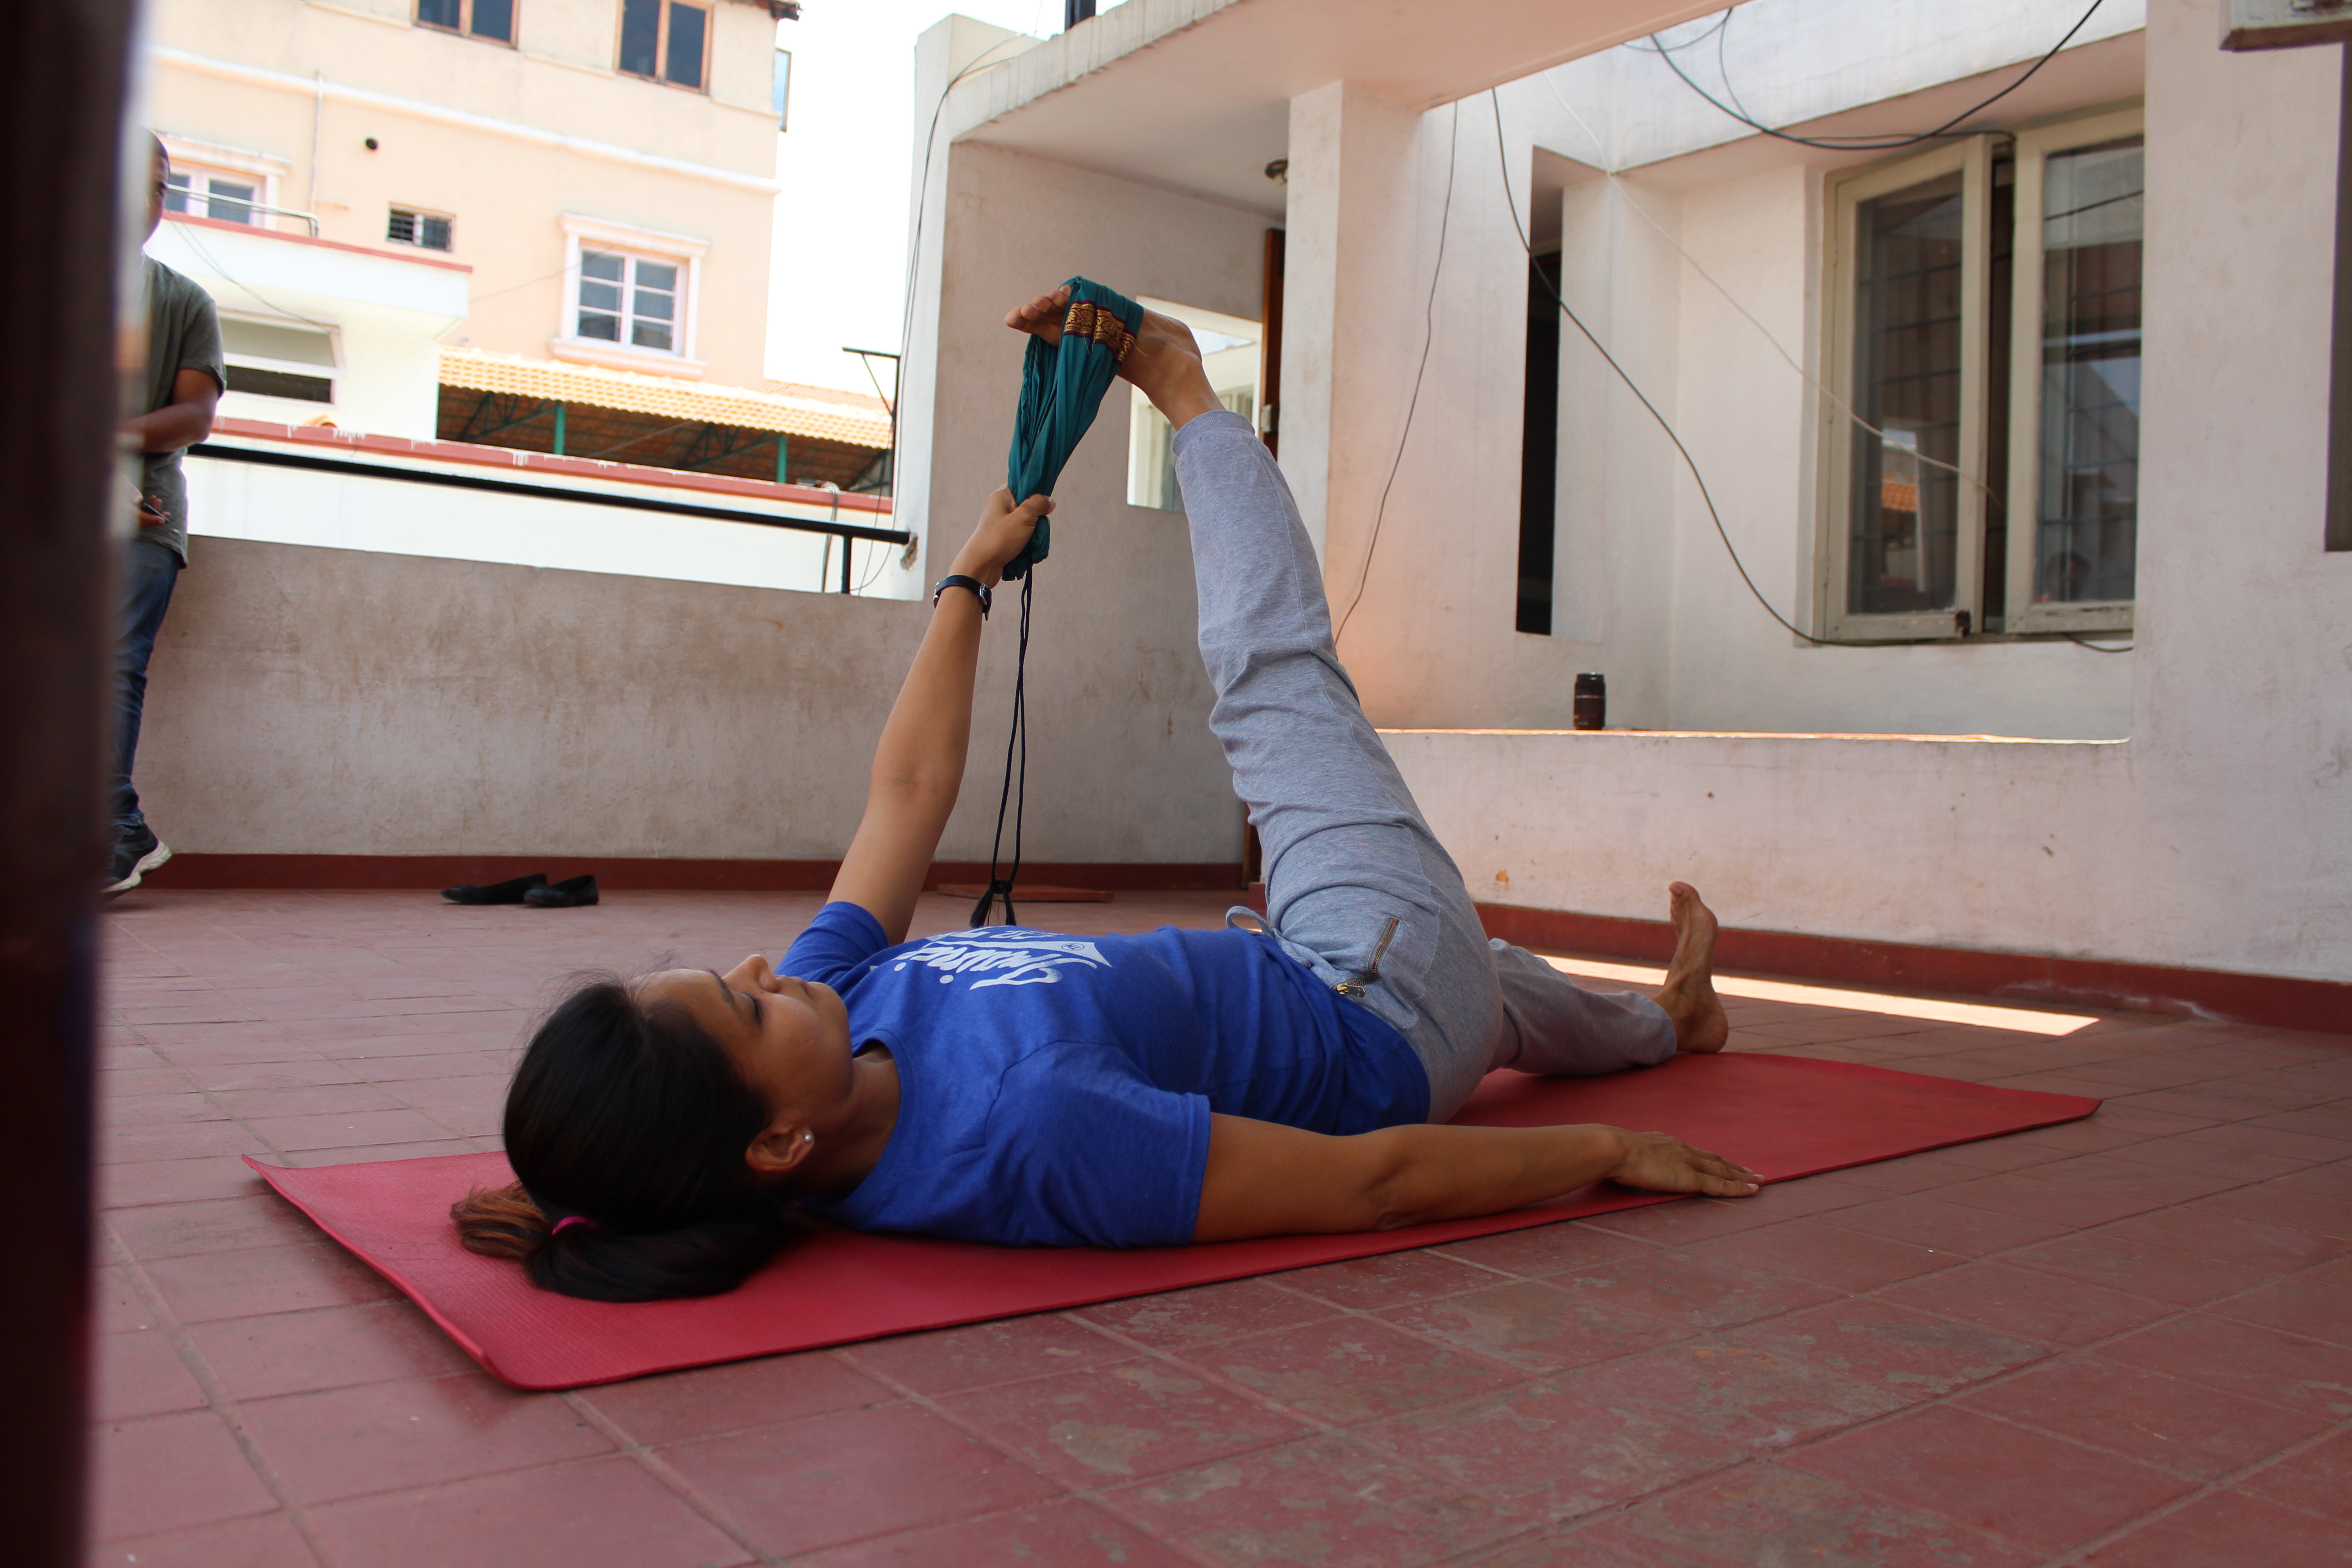
However, thousands of hours of asana practice later, I would say it’s power lies in its ability to gently stretch the spine, the lower back, the shoulders and the sides of your body all at one go.  Just a couple of years ago it was impossible for my knee to rest on the floor, my shoulders would lift off of the floor, I wouldn’t be able to breathe and it would hurt to push my knee down!

Over the years I’ve found that the key lies in the abdomen and the breath.  The breath must be long and steady and the abdomen relaxed.  Once this is in place it becomes easier for the body to sink into the posture.  Watch this video for more pointers on how to do this asana safely.


Benefits of the Supta Marichyasana:

  • Helps to reduce lower backache.
  • Reduces stiffness on the neck and shoulders.
  • Great to keep the spine supple and flexible.
  • Increases blood circulation to the abdominal organs.
  • Gently massages the digestive organs thereby improving digestion.
  • Improves flexibility of the hip, knees and ankles.


When to avoid this asana:

  • Menstruation.
  • If you’ve recently had abdominal surgery.
  • When you’re recovering from a back injury.


Participate in our Work From Home Challenge this entire month and win a giveaway at the end of the challenge.  Download our practice tracker and asana sequence below:

Download Practice Tracker

Download Yoga Sequence


For more information go to:
Medha Bhaskar: https://www.instagram.com/medha.bhaskar/
Amrutha Bindu Yoga: https://www.amruthabindu.com/
Pragya Bhatt: https://www.instagram.com/yogawithpragya/

Enquiries Into Yogic Philosophy

How To : Supta Padangushtasana

May 3, 2020

In Sanskrit, supta means ‘lying down’, pada means ‘”foot”, and angustha is the big toe.  (Yoga the Path to Holistic Health, BKS Iyengar)


Before I started practicing yoga regularly, back pain was something I dealt with frequently.  Whether because of poor posture or because of menstruation, it would just not go away.  Then I discovered the supta padangusthasana and back pain is now a thing of the past.  You can practice this any time and any where.  I sometimes practice this when I’m procrastinating or just too lazy to start a dynamic warm up.  Also, after a whole day of standing because this pose magically stretches out the tiredness.  When I have the luxury of time, I like to work with different variations of this posture while watching something interesting on TV!


The benefits  of the Supta Padangusthasana are:

  • Aligns the pelvic area thereby relieving backache.
  • Stretches the hamstrings and calf muscles.
  • Strengthens the knees and ankles.
  • Tones and relieves pain from the lower back and spine.
  • Relieves sciatic pain.
  • Helps in relieving menstrual pain. (However, don’t practice this while you”re menstruating.)

While the picture above depicts the classical asana, I prefer practicing with props.  The below video demonstrates how you can make this asana work better for you with the use of a few props.


Participate in our Work From Home Challenge this entire month and win a giveaway at the end of the challenge.  Download our practice tracker and asana sequence below:

Download Practice Tracker

Download Yoga Sequence


For more information go to:
Medha Bhaskar: https://www.instagram.com/medha.bhaskar/
Amrutha Bindu Yoga: https://www.amruthabindu.com/
Pragya Bhatt: https://www.instagram.com/yogawithpragya/

Enquiries Into Yogic Philosophy

Supta Baddhakonasana

May 3, 2020

This is a very restful asana that can be practiced even by those who have had bypass surgery. It gently massages the heart and helps open blocked arteries. The pose also improves blood circulation in the abdomen, massaging and toning the abdominal organs.

This is a very restful asana that can be practiced even by those who have had bypass surgery. It gently massages the heart and helps open blocked arteries. The pose also improves blood circulation in the abdomen, massaging and toning the abdominal organs. (Yoga The Path to Holistic Health, BKS Iyengar)


The first posture for the Work From Home Yoga Challenge is the Supta Baddhakonasana or the Reclining Fixed Angle Pose. We know the Badhakonasana as the Butterfly posture.  The most common way to practice it is to ‘flap the wings’ of the butterfly.  While that is a good way to increase the flexibility of your hips and thighs, if done too vigorously it might lead to injury.

You’ve spent a lot of time sitting today.  Whether it’s to work or to watch some Netflix, you’ve probably slouched your way through the day.  Sitting for long periods compresses the spine and leads to tightness in the groin.  This tightness then manifests as a dull throbbing pain in the lower back and tight hips.

The benefits of the Supta Baddhakonasana are:

  • Relieves lower backache.
  • Relieves varicose veins and sciatica.
  • Provides relief from menstrual pain.
  • Helps to regulate blood pressure by relaxing the body.
  • Helps improve blood circulation in the abdomen and abdominal organs.
  • Helps to manage indigestion.

Watch the video to understand how you can use simple props to make the posture more beneficial to you. Pay close attention the positioning of the belt and block, else the posture will be uncomfortable for you.


For more information go to:
Medha Bhaskar: https://www.instagram.com/medha.bhaskar/
Amrutha Bindu Yoga: https://www.amruthabindu.com/
Pragya Bhatt: https://www.instagram.com/yogawithpragya/

Enquiries Into Yogic Philosophy

Some More for Your Back

May 4, 2016

My blog about how you can use a rope to manage, heal and even reverse causes of back ache has been hugely successful.  It’s great that a lot of people with chronic back ache and even disc bulges and slipped discs have tried this blog and  come back to me with positive reviews.  In this blog I’d like to explore alternative asanas which also provide relief from back ache.

pomelo_20160503124108_save.jpg
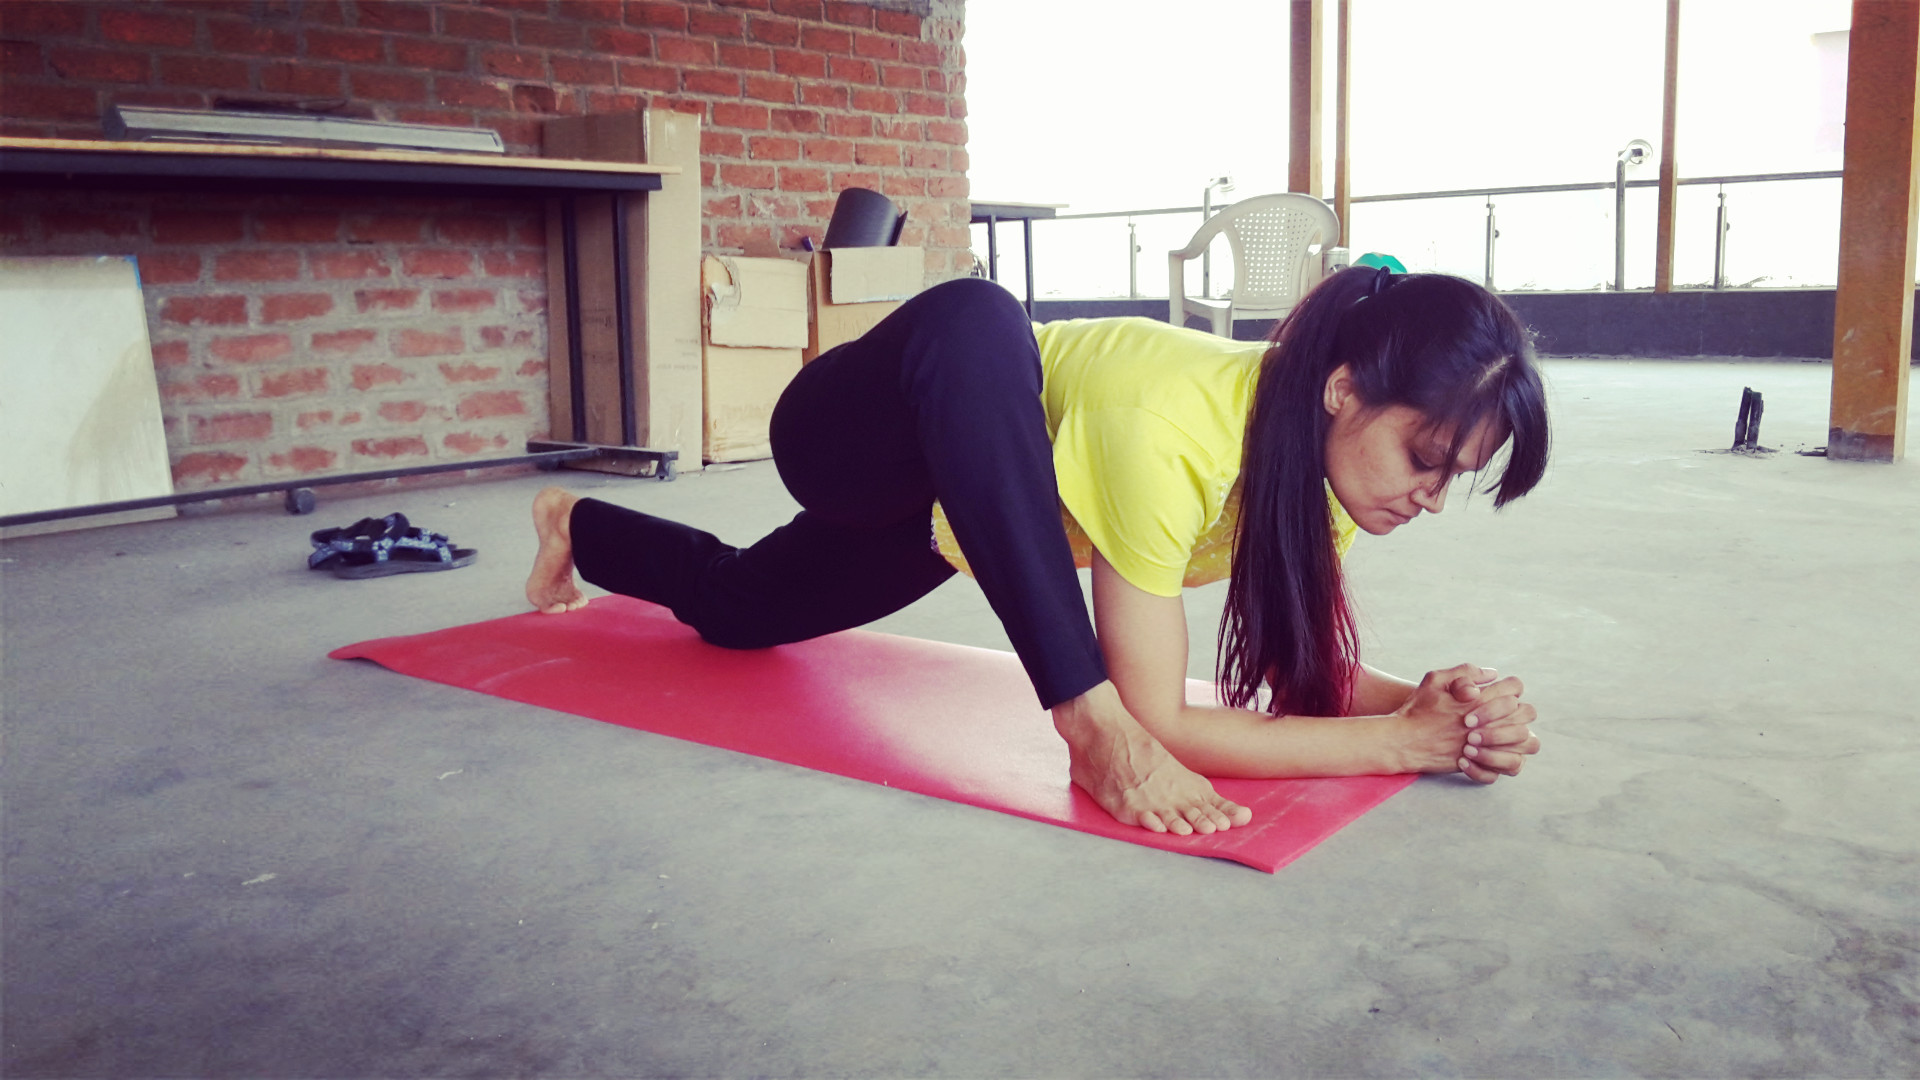
1.  Start with the Ashwasanchalanasana, also called the Low Lunge.  Ensure that your back knee is locked and try and push your hips as close to the floor as possible.  This creates opposing forces within the body and this helps in easing out the kinks in your lower back.  This also stretches the hip joint and strengthens the quads.  When you focus on pushing your heel back, you will feel a stretch on the back of the calves as well.

2. Now place the knee on the floor and intensify the stretch a bit more. pomelo_20160503124123_save.jpg

3.  Now place your elbows on the floor and allow the hips to open up even more.  This pose is called the Lizard pose.pomelo_20160503124153_save.jpg

pomelo_20160503124134_save.jpg

4. Next is the Pigeon pose.  Place your knee on the floor and try and try to get the opposite thigh as close to the floor as you can.  Do this by squaring the hips.  The more you align the hips the better the stretch.


5.  And finally for the Agnistambasana or the Firelog pose.  I try and include this as much as I can in my classes.  In this pose the point to remember is that the knee and the ankle should be directly on top of each other for both legs.


Hold these poses for as long as you feel like.   If you have the time, even 2 minutes on each side would be great.  Since I’m heavily influenced by the Iyengar style I would recommend you find out how to use props to do poses which are a bit challenging for you.

Practice these daily and even more than once a day to manage your back aches.

Enquiries Into Yogic Philosophy

When Your Back Hurts

August 20, 2015

All of a sudden I have lots of people asking me how yoga can help with slipped and herniated discs.  These are people who don’t want to go in for the surgery that the doctor has told them is inevitable.  These are people who are not interested in taking drugs to numb the pain.  Basically, these are people who have heard that yoga can help and want to manage their condition rather than let doctors cut them open.

So here are a set of moves that you should do in the sequence given below.  You need to hold each posture on each side for about 10 minutes.  So you do need to set aside about an hour to do this every day.  Yes, do these every day.  If you do this set of postures while you are experiencing the pain, you will get instant relief.  Tried and tested.

I only had a makeshift yoga belt with me when my friend and I found time to take these pictures.  You can use a stole or a dupatta, basically anything long enough to use for these asanas.

  1.  Start with lying on the floor.  You must fold your legs like in the picture.  The lower back should lie flat on the floor.

IMG_5866

2. Next loop the belt around one foot and straighten the leg.  You lower back should still lie flat on the floor.  Push the heel out.  Keep the toes inclined towards your face.  Also, people tend to think that the closer they can bring the leg to the torso, the ‘better’ it is.  That is not true.  You must keep the leg either straight up, perpendicular to the floor.  If that’s too intense of a stretch for you, then you can bring the leg closer to the floor, until the stretch becomes tolerable.  The heel must always stay extended outwards.  Knee must be locked.  Note: the other leg is bent with the foot on the floor.  This is intentional and you must practice just like this.IMG_5867

3. Straighten the leg which is on the floor.  Do this by slowly walking it out, and not by lifting it up and pushing it forward.  You have to do all these movements slowly and carefully, after all, you want to be careful with you back.  In this posture, both legs mimic each other.  Knees are straight and locked.  Heels are pushed out.

IMG_5868

4. Next ease our leg on to the floor.  Again, no jerky movements.  Also, if you are unable to get the leg all the way down to the floor, you can use a pillow or a small table to rest you leg on.  Heel pushed out.  Knee locked.  And the torso should be flat on the floor.  Usually there is a tendency to lean to one side because of the weight of the extended leg.


IMG_5870IMG_5871

5.  Bring the leg back up and this time, ease it to the opposite side.  Only 30 degrees to the other side.  So lower back is still in touch with the floor.  The opposite leg should stay active.

IMG_5869

6. And finally, the posture which gives the most relief.  For this one you will have to tie the ends of the belt together.  Then insert a leg through the loop and put the opposite shoulder through the other end of the loop.  Almost like you’re carrying a shoulder bag.  Allow the leg to fall sideways.  It doesn’t matter how close your knee/thigh/leg is to your torso.  What matters is how relaxed your leg is.

IMG_5872

Remember to practice each posture on both sides.  Hold for 10 minutes on both sides.  When done daily these moves ensure that your back pain is eliminated.

Thanks Sujith for the photos. 🙂