Monthly Archives

February 2015

Enquiries Into Yogic Philosophy

3 Lessons Acro Yoga Taught Me About Life

February 21, 2015

Every Thursday this month I would catch a bus to a rather far away part of town to meet a group of about 10 people for a session of Acro Yoga.  The group consists of former yogis, graphic designers, sound artists, an acrobat…all coming together…for different reasons.  I would say its for our shared love of yoga, but there are many in the group who don’t practice yoga in the conventional sense.  But I digress.   You see, I wanted to use this vacation to explore and expand my personal practice.  So I decided to explore the yoga scene in Den Haag.  You can watch what I feel about Bikram Yoga here.

I’m actually enjoying the Acro Yoga meetings.  The first thing I noticed was that everyone was at different stages of flexibility and physical fitness.  We were all different as people as well.  Some were students, some were senior citizens etc.  However, all of us had to learn to adapt with each other and work together.  We did not choose our partners on the basis of skill or ability or weight.  In fact, we didn’t choose partners, we randomly divided ourselves into teams and made the most of it.  Lesson #1:  In life you don’t get to choose the cards you’re dealt.  But you can choose to make the most of the cards.

Next I noticed that regardless of how much you could balance or how strong you yourself are, you would only be able to do the poses only if the other person would also cooperate.  So me having strong legs doesn’t necessarily mean that the person I would push up would stay up.  Staying up would require the other person to understand the mechanics of the posture and trust you enough to relax into the pose.  Lesson #2:  In life you need to do your best and hope that your teammates also do their best.  That’s the winning formula.

And perhaps the most important lesson I learned is about balance.  Sthiram sukham asanam is the first Yoga Sutra I learned but I’ve finally understood it.  Patanjali basically says that a posture is a yogasana only when you find stability and peace in it.  In Acro Yoga, the final posture is difficult to hold if you are tense.  Being tense makes it difficult for your partner as well.  There is a perceptible ease in a posture the moment both partners relax, and that’s when the posture becomes easy, stable and peaceful.  Lesson #3:  Relax in the present moment and circumstances.  Only then you will find balance.

I’m off for a while next week so I will miss my Acro Yoga classes.  But I will get back to them as soon as I can.

And yes, I highly recommend Acro Yoga!  Below are a few snapshots from our last class.

2015-02-20 08.15.17[1]

It’s all about working together. John has many many years as an acrobat and without his cooperation I won’t be able to hold him up.

20150219_202140[1]

One of the first moves we learned. I’m getting more and more comfortable in this pose, yet I still need to be prompted to try and get my body in a straight line.

20150219_202224[1]

We always had ‘safeties’. Like Lex here, there should always be people around to catch you in case you fall.

20150219_202236[1]

John could actually feel my comfort level in this pose. When I was comfortable, he would have an easier time doing his bit.

20150219_202318[1]

I would wobble whenever I lost focus or became tense. And the safety was always there.

We became more adventurous:

20150219_202440[1]

20150219_202447[1] 20150219_202454[1]


20150219_202825[1]

John and Lex showing us how its done.

20150219_212658[1]

We cooled down with Iyengar moves!

20150219_203128[1] 20150219_203149[1] 20150219_203230[1]

Enquiries Into Yogic Philosophy

Eat the Beet

February 19, 2015

20150218_135328[1]I posted a picture yesterday of a soup that I had at my mom’s friend’s house.  Everything she made was amazing.  Her ingredients were from the UK and the Netherlands, but the end products were Indian.  So, for instance, she made makki ki roti and sarson ka saag.  She had made dahi papdi and karela…and many many other things.  But I liked this soup best because it has beetroot and garlic.  The ingredients are easily available and loaded with nutrients.  And so easy to make.  Since most good cooks cook instinctively, she was unable to tell me the ratio or the quantity of the ingredients she used.  But here’s what she told me:

1.  Take some beets.  Grate them.

2.  Take some garlic.  Grate them.

You can modify the garlic to beet ratio depending upon how much you like the taste of garlic.

3.  Add lots of water and start to boil.  Boil until the garlic and beet are soft.  Add spices such as cinnamon and salt and black pepper.

4.  When you get the consistency you want then serve hot.

Let me know if you like it as much as I do!!!

Enquiries Into Yogic Philosophy

Week 3 – What Balancing Asanas Teach You About Life

February 15, 2015

On the first day of this week lets practice balancing asanas.  The thing about balancing asanas is that they don’t teach you more than just balance.  They teach you how to balance with constraints.  Your legs may be weak, your arms may wobble a bit or your brain may not be able to focus because of the busy day you have ahead.  But, you have to harness your existing resources and do the asana.  It mirrors real life.  Give it some thought.  So start with the Natrajasana.

The Natrajasana or the Dancer pose.

IMG-20150209-WA0004[1] If you’ve been practicing this pose for a while then you are familiar with the basics.  If you want to push the work in this pose up a notch then reach forward with your arms simultaneously kicking the back foot up.  Hold this stretch.  This will ensure that the other leg also gets a deep stretch.  Try and extend your gaze in front of you, you can even try to keep your eyes on the fingertips.  Count to 10.  Slowly.  Both sides.

You can also try the below variation.

2015-02-15 14.42.00[1]


Kakasana or the Crow Pose

Photo Collage Maker_0Dymy2[1]This is a pose we practiced on Thursday this week in my Acro Yoga group.  Have you fallen on your face in this pose?  Remember, that’s almost like a requisite to find balance in this pose.  Like in life.  Once you muster up your courage to face your fear, it ceases to have a hold on you.

Once you’ve fallen and realize that it’s no big deal then try and lift one foot up and then the other.  Beginners may notice that their knees are on the outside of their arms.  That’s ok.  Continue to tighten your core and arms.

Garudasana or the Eagle Pose

Once you’re comfortable with the basics of the pose, the try and bend the standing leg as much as you can.  IMG-20150209-WA0009[1]Try and push the shoulders down and forward.  Hold for a count of 10.  Slowly.  You can also try and apply the Moola Bandha.

On the second day of this week focus on twists.  Twists help in increasing the digestive fire of your system.  This in turn revs up your metabolism.  Along with this, twists help in maintaining the flexibility and mobility of the spine.

The Marichyasana or Sage Marichi’s Pose

2015-02-15 15.11.43[1]What most people forget when practicing this pose is that both feet must be alert.  One foot should be pointed in towards your face and the other foot should be pushed into the floor.  The hand on the floor should be active and participating in keeping the spine straight.  Both shoulders should be in one line.  The hand which is bent should push the knee back and the knee should push the elbow out.  This creates life in this pose.  Keep your fingers active as well.

The Ardhamatsyendrasana or the Half Lord of the Fish Pose

This is an advanced spinal twist.  There are many variations of this twist.  Opening up the chest and pushing the shoulders back gives length to the arms which helps in grabbing both hands behind your back.  Pull your stomach in.  Keep both hips on the floor.  Make sure the leg which is on the floor is flat on the floor.  The knee should not lift up off of the floor.

Photo Collage Maker_UYopz9[1]

The Chair Twist or the Utkatasana

In the Utkatasana try and reach forward with your arms2015-02-15 15.02.33[1] and sit back on your heels.  Reach down with your tailbone.  When you twist, join your hands together tightly.  Push your elbow against your knee, but make sure the knee is firm in its place.  Elongate your neck and push your shoulders down.  Expand your chest.


Try these asanas and let me know how it goes!


Enquiries Into Yogic Philosophy

Week 2 Day 2 – Extend the Sides

February 11, 2015

Most gym rats will tell you that you should work on sides and abs on alternate days.  What makes yoga a great workout is that most yoga classes have varied routines and you will end up engaging different body parts even if you attend the same class 5 times a week.  Some days it may be abs intensive, on other days, perhaps, arms.  But, for the most part, you will use your body as a whole instead of just working out isolated body parts.  So while you’ll work on sides pretty much in all your yoga classes, there are a few moves that you can do with a bit more awareness next time so that you can get the most out of them.

The Side Plank or the Vashishtasana

Most people tend to put most of their body weight on their arm and wrist when they do the side plank.  Are you one of those?  If your wrists hurt when you do this move, then the answer is yes.  The key to improving your form and increasing the amount of time you can hold this move is in how you engage your arms.  Tightening the musIMG-20150209-WA0016[1]cles of your arms helps in taking the pressure off of your wrists.  To do this you can try and spread your fingers out wide on the floor.  And the  push your shoulders away from your ears.  So on hand reaches all the way up to the sky and you stretch your shoulder blades as well.  The other hand pushes into the floor, so you try and dig your fingers into the floor also.  The neck should be relaxed.  Sometimes you may not realize that your neck is strained.  A good way to ensure that your neck is easy is to smile and allow your face to relax.  This relaxes the neck as well.

Once your arms take on the proper form, you can start to work on your sides.  Keep your stomach tight at all times and then gently push your hips up towards the sky.  This gives you a little elevation and also ensures that you keep your awareness on your core.  That little lift makes a huge difference, else you may tend to sag down closer to the floor, which will put more strain on the shoulders.  Finally, keep your knees locked.   This will ensure that you are engaging your legs in maintaining the balance as well.

The Trikonasana or the Triangle Pose

Despite years of practice, I feel that it is only now that I’ve really started appreciIMG-20150209-WA0003[1]ating this pose.  All yoga poses give you a sense of release and relaxation post the practice.  If you don’t feel it now, with consistent practice, you eventually will.  The key to the Trikonasana is doing it step-by-step.  Many students go into the pose with the end picture in mind.  Yes, many experienced students as well.  But that just leads to a compromise with the geometry of pose.  Do it stepwise and when you finally bend down make sure you bend from the waist.  Your torso should be parallel to an imaginary wall.  Try and get both shoulders in one line and reach up to the sky and down to the floor almost drawing your shoulder blades apart.  Make the pose active right through your fingertips.  Focus on your feet as well.  The inner edge of the front foot will go into the floor and the outer edge of the back foot will be pushed into the floor and this will give you stability in this pose.

Note on this pose.  Iyengar said in an interview that even after countless years of practice, writing books and articles, conducting workshops all over the world etc, he is still working on getting his awareness to his smallest toe in the Trikonasana.

The Parsvakonasana or the Side Angle Pose

The base work in this pose is similar to the Trikonasana.  What you need to take care of most in this pose is that the knee is right above the ankle.  The inner edge of the foot should be strong on the floor.  Keep the thigh parallel to the floor.  Extend your arm out and keep it close to your ear.  Keep your gaze on your fingers but relax the neck.  Feel the extension on the side of the body, from your foot all the way to the finger tips.

IMG-20150209-WA0005[1]

Questions? Queries?  Let me know!

Enquiries Into Yogic Philosophy

Week 2 Day 1 – Abs Are Made in the Kitchen…

February 8, 2015

…But you have to work on them in yoga class too!  So for Day 1 of Week 2 do a bit of abs work.  The great thing about yoga (and particularly about our classes) is that most yoga moves involve the core.  Every single time you do a rep of the Surya Namaskar, you’re utilizing your core strength.  So today practice a few rounds of the Surya Namaskar to warm up and then start with your leg raises.  You can do 3 sets of 15 each.  Take a small break and repeat twice more.  You can choose to plank and side plank as well.  These moves engage the core and strengthen the arms as well.

The Naukasana (The Boat Pose) is an awesome way to strengthen the abs and also to test your balance.  Start with lying down on the floor and raise your torso and legs up at the same time.  No jerky movements.  Keep your legs absolutely straight.  Push your shoulders back and try and expand the chest.  Elongate the neck.  Breathe.  You should be balancing on your tailbone.

2015-02-03 13.47.14[1]

Setubandhasana (The Bridge Pose)

2015-02-03 13.36.53[1]After the Naukasana you can start to stretch your abs a little bit.  Start with the Setubandhasana.  Start with keeping your feet about hip width apart.  Keep your arms on the floor next to your body with your palms flat on the floor.  Push into the floor with your hands and press your feet into the floor and raise your hips up.  Tighten your glutes to take the load off of your back.  Make sure that your ankles and knees are in one line and perpendicular to the floor.  Once your hips are as high as you can take them lift your hands and place them on the small of your back.  Your fingers should be facing each other and thumbs should be on the outside, circling your waist.  This helps in strengthening the arms and wrists.  Try and get your elbows as close to each other as possible.  Your shoulder2015-02-03 13.38.31[1]s should also be pushed back and chest should be expanded.  You should also experience the Jalandhar Bandha.


Chakrasana (The Wheel Pose)

After the Setubandhasana, the Chakrasana is a great way to deepen the stretch on the torso.  As a prep, you can practice holding the Bhujangasana.  After this lie down on 2015-02-03 13.40.17[1]the floor on your back.  Bend your arms and place your hands under your shoulders.  Bend your legs and bring your feet as close to your hips as possible.  Lift your hips up first just like you did in the Setubandhasana.  Then start to push your hands into the floor and raise the shoulders up as well.


The Halasana or the Plough Pose

When you practice back bends its important to do complementary poses as well.  The complementary pose for the Chakrasana is the Halasana.  In the Halasana yo2015-02-03 13.45.16[1]u must try and get your spine straight.  The Jalandhar Bandha in the Halasana is a deeper and stronger one than the one in the Setubandhasana.  Keep your elbows locked and arms clasped.  Push your shoulders away from your ears.


Try this cool variation as well:

2015-02-03 13.43.55[1]


Remember after all this you must go into the Savasana and allow your spine to rest and relax.


Enquiries Into Yogic Philosophy

Week 1 Day 2 – Some Arm Work

February 3, 2015

Holding the Chaturanga for 2 minutes is an awesome way to test your core and arm strength.  If you want to make it a bit more challenging do the Chaturanga pushups.  Basically you lower yourself towards the ground until your arms are parallel to your body and then push up into the regular plank.

Besides this you can do the little move demonstrated in this video:

https://www.youtube.com/watch?v=HWb3tAgFlfE

The Adhomukha Svanasana is an awesome way to stretch the entire body.  The picture below is not a great one of the pose since I’m wearing socks (extremely cold in Delhi) and my sister doesn’t have a yoga mat (still recovering from shock).    However, remember that this asana is also about core strength.  You want to use your core strength to elongate your spine.  Push your index finger and thumb into the floor to lift and lengthen your body.  The stretch on both sides of the body should be equal, so if you feel you are engaging your right hand more (as most right handed people tend to do), then actively start to push your left into the floor.  Your heels DO NOT need to touch the floor.  However, you need to ensure that the back of your legs are 2015-01-31 20.02.22also stretched.  The heels should not lean in towards each other, they should be pushed slightly away from each other.  The challenge in the Adhomukha Svanasana is to elevate the tailbone as much as you can, without compromising the length of the spine.

This asana is to be practiced on arms day because it’s through arm work that you’ll be able to lengthen and straighten the spine.  Work on opening up the shoulders and pushing the shoulder blades closer to each other.  Bring awareness even to the armpits and see if you’re able to feel a stretch in the armpits as well.


Finally practice the Gomukhasana to get an intense stretch on the arms, shoulders, 2015-01-31 19.59.43chest and shoulder blades.  A lot of people tend to bend the elbow which is up (in the picture below the right elbow) forward.  Actively push both elbows back.  Elevate the spine.  Push both feet into the floor for a greater lift.  Hold it for 2 minutes on each side and you’ll start to feel your body opening up.


Enquiries Into Yogic Philosophy

Week 1 Day 1

February 2, 2015

I tried to update this blog from the airport in Dubai, but I was only able to connect for about half an hour and that wasn’t enough time for this post.  So, without further ado, let’s get on to the asanas for Day 1 of Week 1.  I’ve tried to put in all the cues that I give during class, but I think it’s always a good idea to get inputs from fellow practitioners.

On Day 1 start by practicing asanas to strengthen your legs.  You can do the Utkatasana (Chair Pose) and squats as well until you feel your quads on fire.  After that do the following stretches.

Trikonasana (The Triangle Pose)

2015-01-31 20.05.01Remember this asana is not about grabbing your ankle.  It’s all about the spine.  Visualize an imaginary wall in front of you and try and get your torso as flat against this wall as you can.  This will ensure that your spine is extended.  Use your core to help extend the spine.  Make sure you don’t rest your hand on the leg, but just rest it gently on the leg.  Your neck and face should be relaxed.  Make sure to push the inner edge of the front foot into the floor and the outer edge of the back foot into the floor.


Parsvakonasana (The Side Angle Pose)

Next deepen your stretch by bending the front leg and getting into the Parsvakonasana. Your front thigh should be parallel to the floor and the arm should be extended out. 2015-01-31 20.03.49 
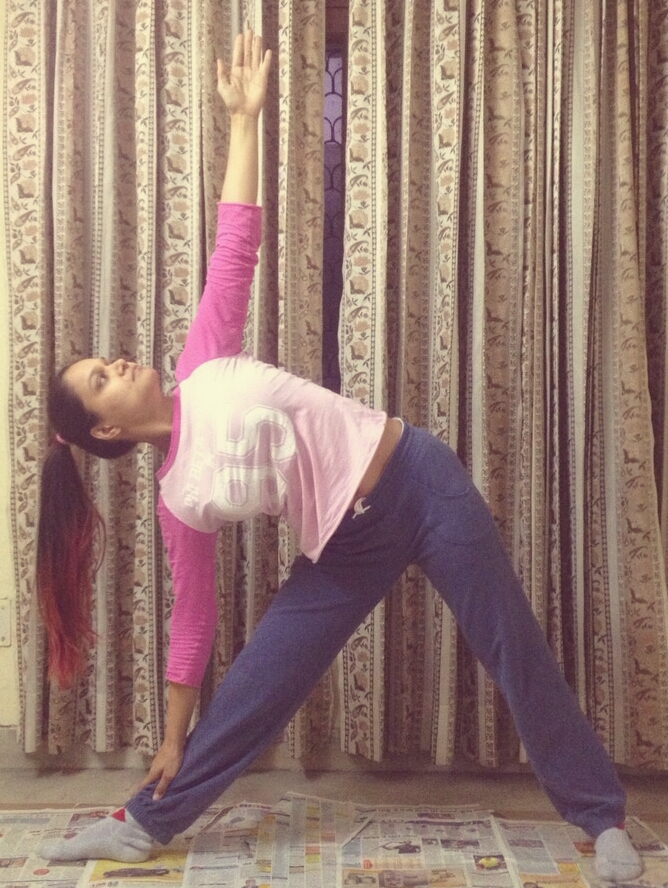
There should be a uniform stretch along the side of your body.  Make sure the side of your body doesn’t rest on the thigh.  To ensure this you may want to slightly lift your hand off of the floor ensuring your core and your legs have to support your body weight.  Look up at your finger tips.  Relax your neck and face.


Janusirsasana (Head to Toe Touch)

IMG-20150131-WA0017
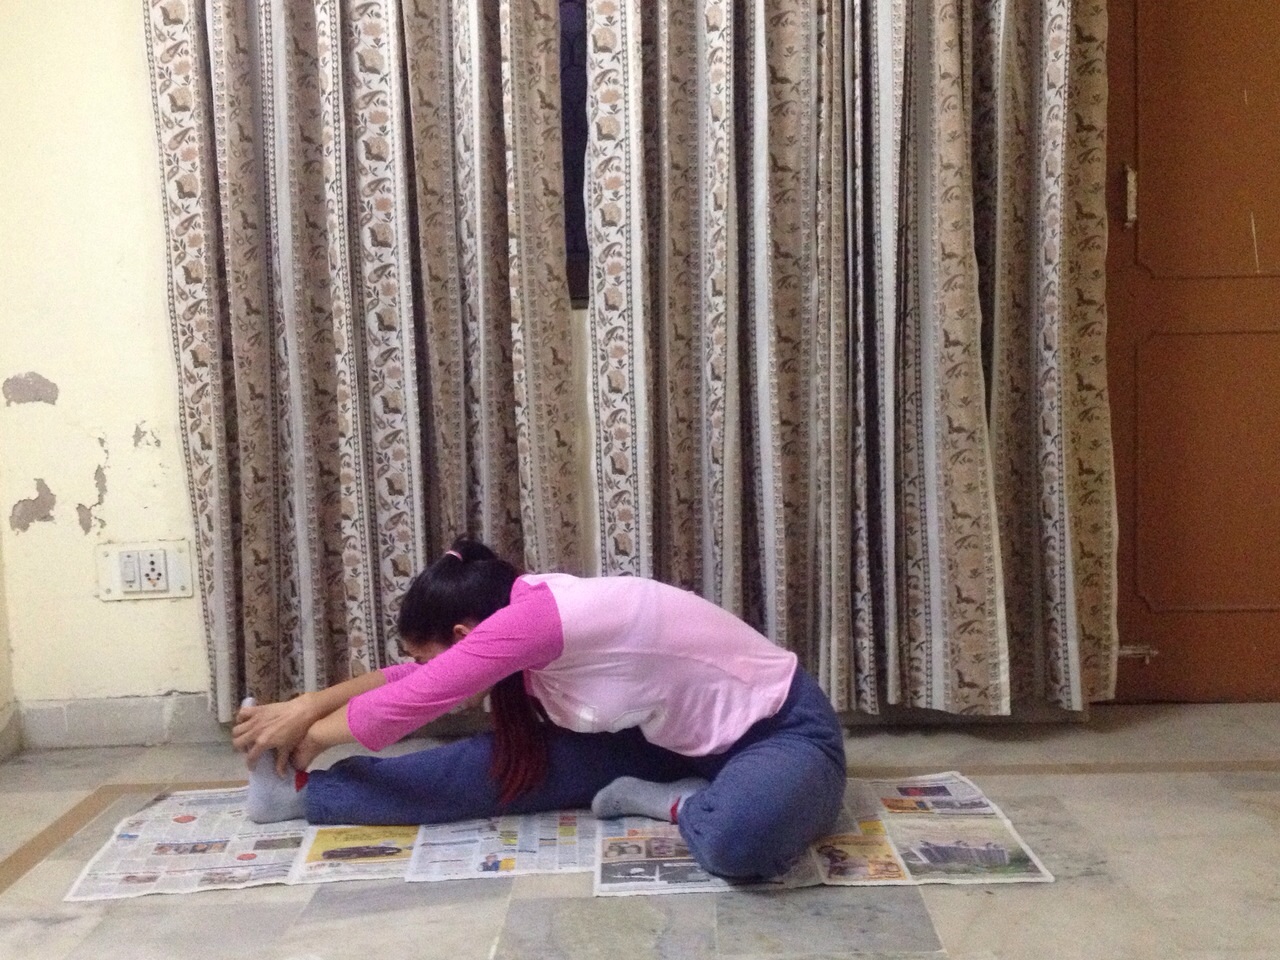
Do this pose in the end to stretch the back of your legs.  However, in this pose, as in all other poses, pay attention to your core.  You want to make sure that you pull your stomach in and extend forward keeping your back straight.  This will ensure a deeper stretch.  Aim to get your chin to the knee instead of forehead to knee.  Also, make sure you cross your arms when you reach forward.  This ensures that the stretch on your back is even.