Browsing Tag

yoga for strong legs

Yoga

The Horse Pose

January 10, 2014

Ashwasanchalanasana  (Horse Pose/Low Lunge)

How To

  1. In the Padahastasana place your fingers next to your toes so that they are in line with each other.
  2. Lift your right leg off of the floor, take it back and place it on the floor.
  3. Look forward.
  4. Make sure that your left knee is in line with your left ankle.  The knee should NEVER go beyond the level of the ankle.
  5. Look straight ahead.
  6. Repeat on left side.

Variations

If your legs and thighs are a bit stiff, or if you have weak knees and ankles, then place your back knee on the floor.

Benefits

  • Great to strengthen the legs.
  • Relieves stress by opening up the groin region and the hips.
  • Helps in stretching and strengthening the spine.
  • Opens up the chest and enables deeper breathing.
  • Provides a massage to the abdominal organs and stimulates digestion.
  • Corrects curvature of the back.
  • Alleviates symptoms of sciatica.

Contraindications

  • Practice with caution if you have a knee injury.
  • Be cautious if you’ve had a neck injury.  Don’t strain to look forward, look down instead.
  • Practice with caution if pregnant.  If required place the back knee on the floor.
  • Practice with caution if you have a back injury.
  • Do not practice if you have stomach ulcers.
  • Do not practice if you’ve just undergone abdominal surgery.
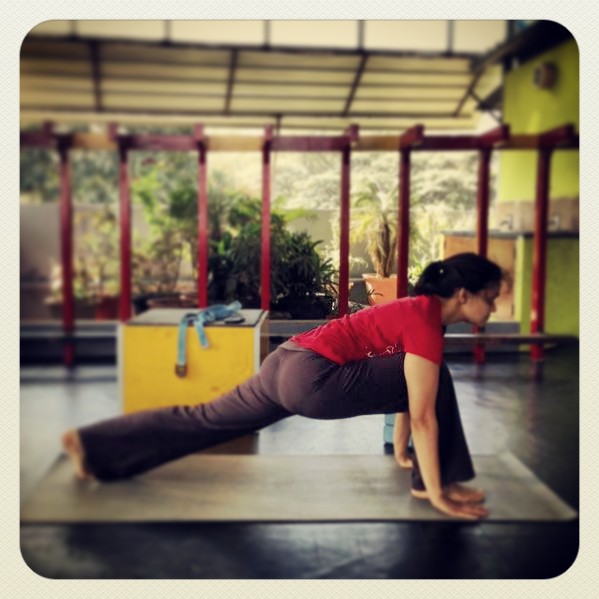
Also called the Anjaneya asana, the horse pose and the low lunge.

Also called the Anjaneya asana, the horse pose and the low lunge.

Yoga

Getting Over That Hangover – Pose 2

October 23, 2013

Utkatasana (Chair Pose) with a Twist

How To:

  1. Start with your legs together, toes touching, knees touching, back straight, shoulders relaxed.
  2. Start to inhale and as you inhale bring your hands up and over your head making sure to align your arms with your ears.
  3. Lock your elbows.
  4. As you exhale sink down as though you were sitting in a chair.
  5. Make sure that you can see your toes and that your knees are not leaning too far forward and covering your toes.  Also make sure that your knees are together.  Your knees should be directly above your ankles.
  6. Hold your torso as erect as possible. [Note:  If you are new to this pose, you can stand with your feet hip-width apart.]
  7. Now bring your hands into the Namaskar mudra in front of your chest.
  8. Twist your torso to the right so that your left elbow makes contact with the outer edge of the right knee.
  9. Leverage the strength of your left arm to gently push your chest forward.  Look up at the ceiling.

Benefits

  • Great to increase flexibility of the spine.
  • Strengthens legs, hips and back.
  • Helps in alleviating flat feet.
  • Great to stretch the torso, shoulders and chest.
  • Stretches your abdominal muscles as well.
  • Great for sciatica and for arthritis of knees and ankles.
  • Tones the abdominal organs.

Contraindications

  • Practice with caution during menstruation.
  • Those with lower back problems should be careful when practicing this posture.
  • Avoid if you have a meniscus problem in the knee or any other knee problems.

seated_chair_twist_crossfit